 CompareIQ
 TestIQ
 MigrateIQ
 Sales Order Agent
What is UDE and why should you use it?
The Unified Developer Environment (UDE) lets you write X++ code in Visual Studio on your own laptop, while the code runs in a cloud environment that you manage from the Power Platform admin center. You no longer need a big cloud-hosted virtual machine from Lifecycle Services (LCS).
In the old way, every developer had a Cloud Hosted Environment (CHE). It was one large Azure VM with Visual Studio, SQL Server and the F&O server (AOS) all on the same machine. You had to pay for it, start and stop it, and wait hours to deploy a new one.
With UDE, the work is split into two parts:
- Your PC holds Visual Studio, the F&O metadata (source code) and a small local database for cross-references. You write and build code here.
- The cloud UDE runs your X++ code, stores the business data and is linked to Dataverse. You deploy your model to it and debug it from Visual Studio.
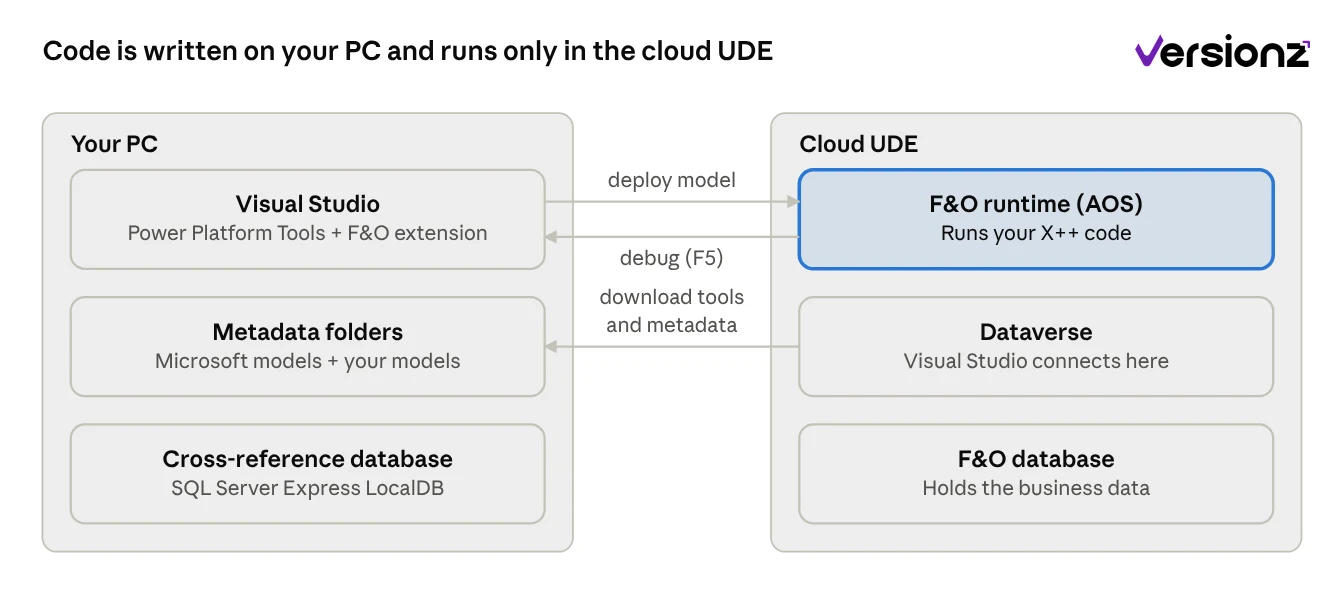
You write and build on your PC. Every run, test and debug session happens in the cloud UDE after you deploy.
Microsoft is moving F&O environment management from LCS to the Power Platform admin center, so UDE is now the recommended way to develop. By the end of this guide you will have a working UDE, Visual Studio connected to it, and your first model built, deployed and debugged.
The whole setup has five steps:
- Create the UDE environment.
- Prepare your developer machine.
- Connect Visual Studio and download the F&O tools and metadata.
- Configure the metadata.
- Create a model, then build, deploy and debug it.
Before you start
Check these items first. Most setup problems come from a missing license, a missing role or low capacity.
| What you need | Details |
|---|---|
| License or admin role | A Dynamics 365 license that allows F&O provisioning, such as Dynamics 365 Finance, Dynamics 365 Supply Chain Management, or (for partners and ISVs) Dynamics 365 Operations Application Partner Sandbox. Instead of a license, you can have the Power Platform Administrator or Dynamics 365 Administrator role in Microsoft Entra ID. A newly given role can take up to 12 hours to start working. |
| Capacity | At least 1 GB of free Operations and Dataverse database capacity in your tenant. Check the Capacity page in the Power Platform admin center. |
| Role in the environment | The developer account must have the System Administrator security role in the UDE. |
| Operating system | Windows 10 or Windows 11. |
| Disk space | At least 16 GB free on the system drive (usually C:) for the F&O extension and metadata. |
| Visual Studio | Professional or Enterprise edition, with the components listed in Step 2. |
| Local database | SQL Server Express LocalDB (installed with Visual Studio) or a full SQL Server, for the cross-reference database. |
| PowerShell (optional) | Windows PowerShell 5.1, only if you create the UDE with a script. PowerShell 7 does not work for this. |
Which Visual Studio version? Microsoft's "Visual Studio requirements for X++" page lists Visual Studio 2022. Microsoft has also announced that from Platform Update 74 (version 10.0.50), X++ development moves to Visual Studio 2026 and Visual Studio 2022 is no longer supported. So check your environment's version first: on 10.0.50 or later, install Visual Studio 2026. The steps in this guide stay the same; only the version number in some file names changes.
Step 1: Create the UDE environment
A UDE is a Power Platform Sandbox environment with Dataverse, with F&O installed and developer tools turned on. You can create it from the admin center screens (Option A) or with a PowerShell script (Option B). Both give the same result.
Option A: Create it in the Power Platform admin center
A1. Create a sandbox environment with Dataverse
- Sign in to the Power Platform admin center.
- Go to Manage > Environments and select New.
- Enter a name. Keep it short, because the Dataverse URL hostname must be 19 characters or less. The name must also be unique.
- Set Type to Sandbox and choose your region.
- Set Add a Dataverse data store to Yes, then select Next.
- Set Enable Dynamics 365 apps to Yes. This is very important: you cannot change it later, and without it the F&O apps will not install.
- Do not pick the Finance or Supply Chain Management template on this screen. A template chosen here gives you a normal sandbox without developer tools. You will install the F&O apps yourself in the next steps.
- Optionally pick a security group to limit who can access it, then select Save.
A2. Install the Platform Tools app
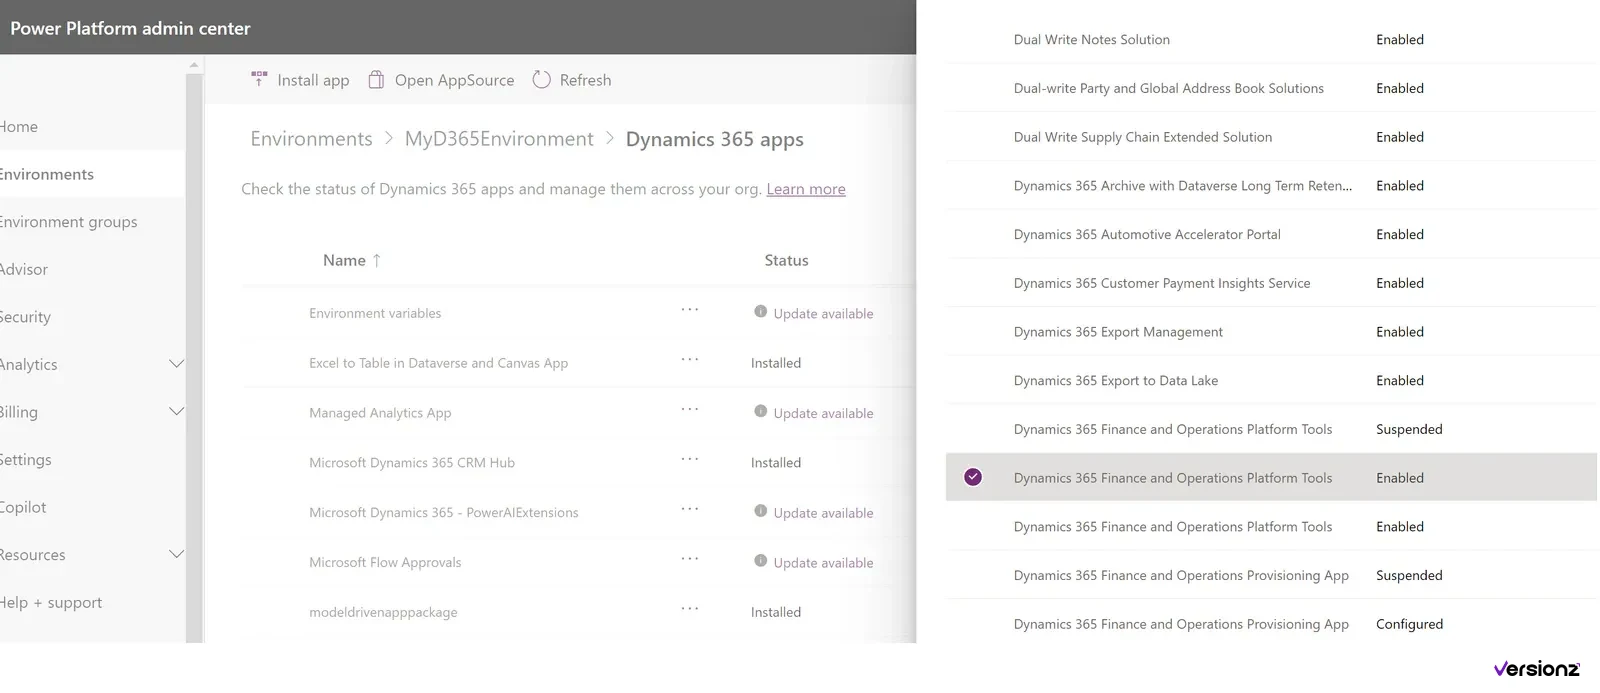
- Open your new environment. On the Resources card, select Dynamics 365 apps.
- Select Install app and choose Dynamics 365 Finance and Operations Platform Tools. If you see more than one entry, pick the one with status Enabled.
- Select Next, accept the terms and select Install.
- Wait until the status changes from Installing to Installed.
A3. Install the Provisioning app with developer tools
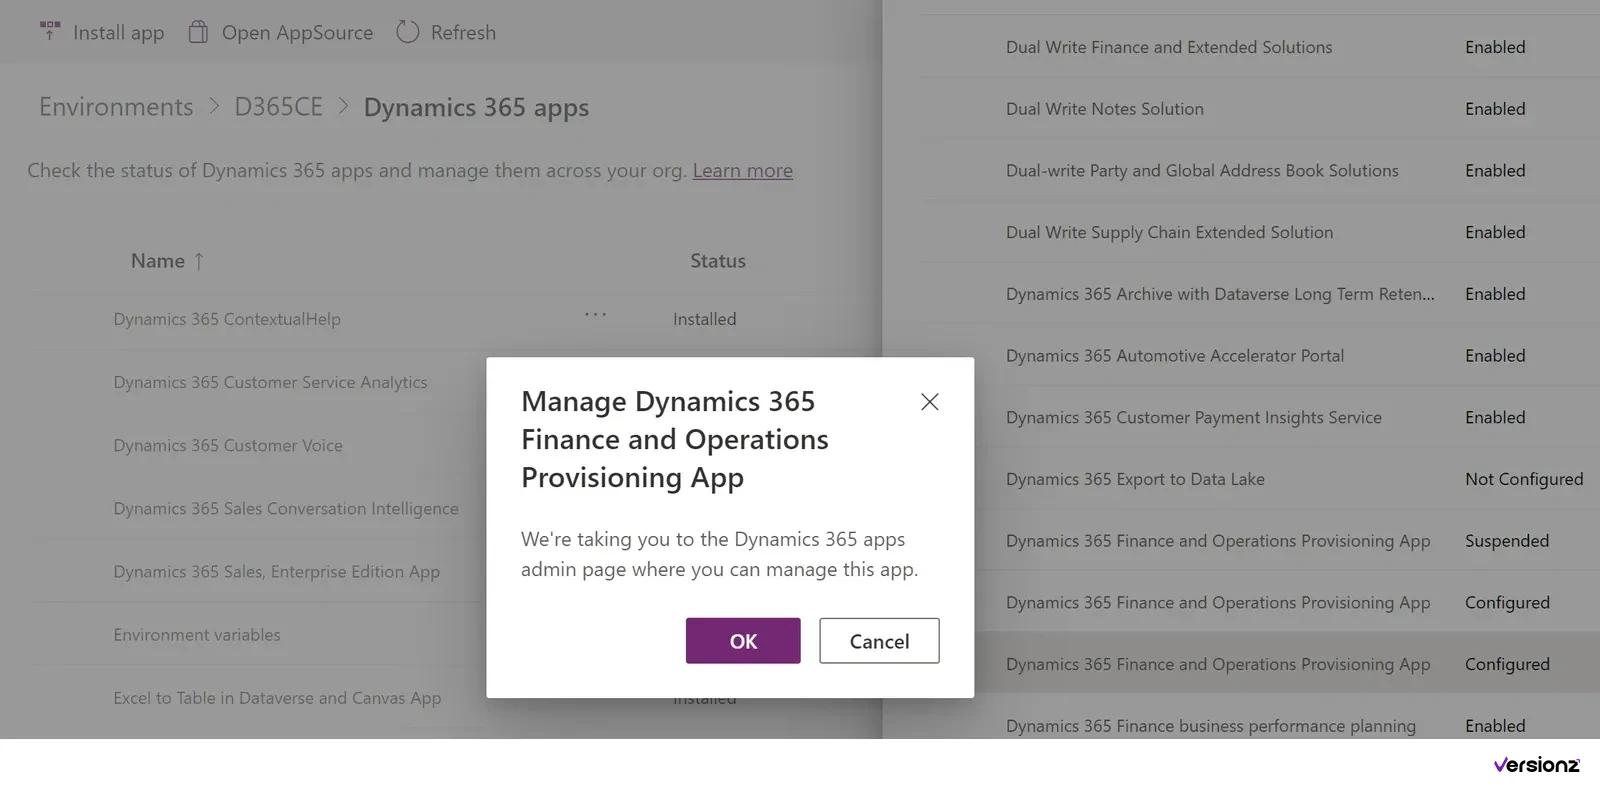
- Select Install app again and choose Dynamics 365 Finance and Operations Provisioning App. If you see more than one entry, pick the one with status Configured.
- Select Next, then OK in the message that appears. The installation wizard opens.
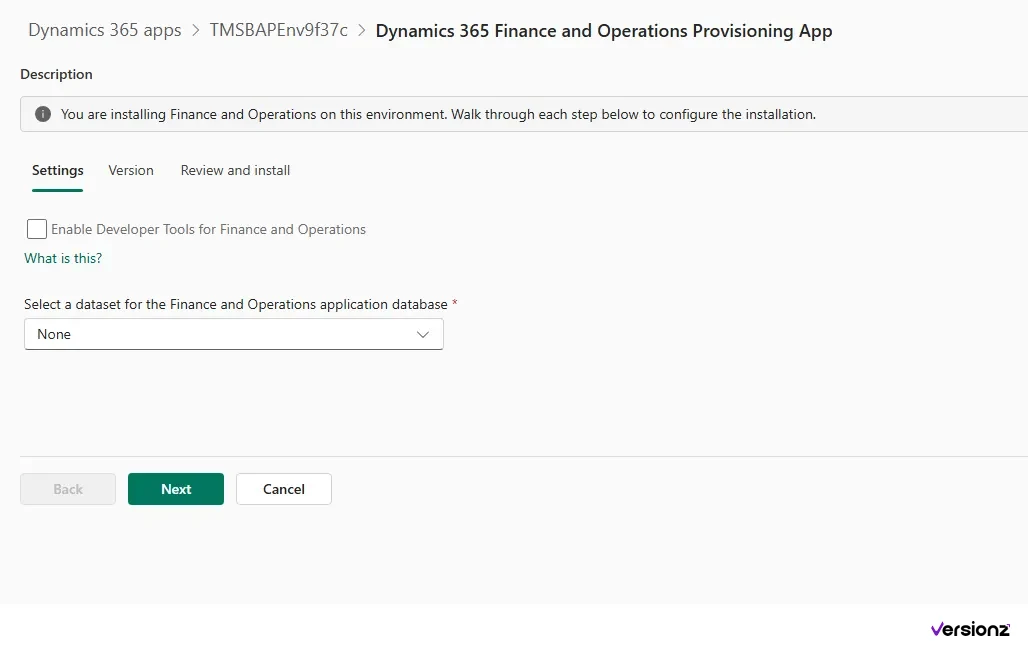
- On the Settings step, tick Enable Developer Tools for Finance and Operations. This is the box that makes it a UDE. If you leave it empty, you get a normal sandbox and Visual Studio cannot connect.
- In Select a dataset for the Finance and Operations application database, choose Demo for the Contoso sample data or None for an empty database. Select Next.
- On the Version step, select the product version. Pick the version that matches your project's sandbox or production environment. Select Next.
- On the Review and install step, check that developer tools show as Enabled. Tick I agree to the terms of service and select Install. The install can take up to a couple of hours.
A4. Check that it worked
Open the environment details page. You should see two URLs:
- Environment URL, for example
https://contosoude01.crm.dynamics.com. Visual Studio uses this one. - Finance and Operations URL, for example
https://contosoude01.operations.dynamics.com. You open F&O in the browser with this one.
If the Finance and Operations URL does not appear, edit the environment and change a field such as Description. This forces the URL to sync.
You must install Platform Tools before the Provisioning app. If you do it the other way, the install fails with a message asking you to install Platform Tools first.
Option B: Create it with PowerShell
This is one command that creates the environment and installs F&O with developer tools. Run it in Windows PowerShell as administrator (not PowerShell 7).
B1. Install the admin module and sign in
Install-Module -Name Microsoft.PowerApps.Administration.PowerShell
Add-PowerAppsAccount -Endpoint prod
If Windows blocks the script, run Set-ExecutionPolicy -Scope CurrentUser -ExecutionPolicy RemoteSigned first.
B2. Set the template options
$jsonObject = @"
{
  "PostProvisioningPackages":
  [
    {
      "applicationUniqueName": "msdyn_FinanceAndOperationsProvisioningAppAnchor",
      "parameters": "DevToolsEnabled=true|DemoDataEnabled=true"
    }
  ]
}
"@ | ConvertFrom-JsonDevToolsEnabled=truemakes it a developer environment. Never set it to false for a UDE.DemoDataEnabled=trueloads Contoso demo data. Set it tofalsefor an empty database.
B3. Create the environment
New-AdminPowerAppEnvironment -DisplayName "ContosoUDE01" -EnvironmentSku Sandbox -Templates "D365_FinOps_Finance" -TemplateMetadata $jsonObject -LocationName "India" -ProvisionDatabase- DisplayName must be unique and under 20 characters.
- LocationName is your region, for example
India,EuropeorCanada. - Templates depends on your license:
| Your license | Template ID |
|---|---|
| Dynamics 365 Finance | D365_FinOps_Finance |
| Dynamics 365 Supply Chain Management | D365_FinOps_SCM |
| Dynamics 365 Project Operations | D365_FinOps_ProjOps |
| Dynamics 365 Operations Application Partner Sandbox | D365_FinOps_ProjOps |
If the command returns MacroRegionRequired, your region needs a macro region. In that case use the Power Platform API to create the environment, because this module has no macro region option.
Provisioning runs in the background. Watch the environment in the admin center until it is ready, then do the check in A4.
After either option
Add your developer account to the environment with the System Administrator security role. Without this role, Visual Studio cannot download the tools or deploy code.
Step 2: Prepare your developer machine
Your PC only needs Visual Studio, a few components and LocalDB. You do not install the F&O server (AOS) locally anymore.
2.1 Install Visual Studio with the right components
In the Visual Studio Installer, select these items:
| Type | Name | Required? |
|---|---|---|
| Workload | .NET desktop development | Yes |
| Individual component | Modeling SDK | Yes |
| Individual component | DGML editor | No, but useful for dependency graphs |
If Visual Studio is already installed, open it and go to Tools > Get Tools and Features > Individual components to add the missing ones.
2.2 Add the report designers (for SSRS work)
From Extensions > Manage Extensions, install Microsoft Reporting Services Projects and Microsoft RDLC Report Designer. You need these to open and edit report designs.
2.3 Check that LocalDB works
Visual Studio uses SQL Server Express LocalDB to hold the cross-reference database. It is installed with Visual Studio, but test it before you continue. Open a Command Prompt and run:
sqllocaldb create MSSQLLocalDB -s
sqllocaldb info MSSQLLocalDB
The second command should show the state as Running. You can also connect to (localdb)\MSSQLLocalDB from SQL Server Management Studio with Windows authentication.
2.4 Install Power Platform Tools for Visual Studio
- Open Visual Studio and go to Extensions > Manage Extensions.
- Search for Power Platform Tools and select Install.
- Close Visual Studio so the installer can finish, then open it again.
- Do not install the plug-in profiler that the Power Platform Tools article mentions. You do not need it for F&O.
2.5 Review the Power Platform Tools settings
Go to Tools > Options > Power Platform Tools and check these options:
| Option | What it does | Suggested setting |
|---|---|---|
| Auto setup for Dynamics 365 if using Unified environment | Extracts the metadata and creates the metadata configuration for you | On (default) |
| Do not display Power Platform Explorer | Makes connecting to the environment faster | On |
| Download logs | Downloads logs for deployment and database sync | On, so you can troubleshoot failed deployments |
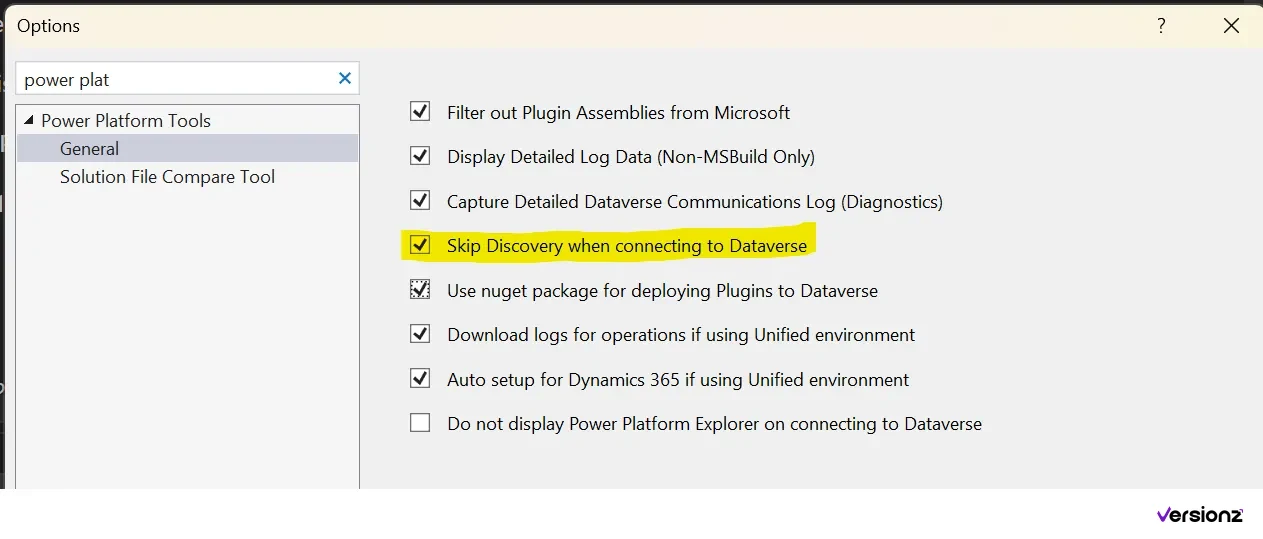
Keep auto setup on unless you want to control folders and the database name yourself (see Step 4).
Step 3: Connect Visual Studio and download the F&O tools
When Visual Studio connects to your UDE for the first time, it downloads the F&O extension and the full system metadata that match your environment's version.
3.1 Connect to the environment
- Open Visual Studio and select Continue without code.
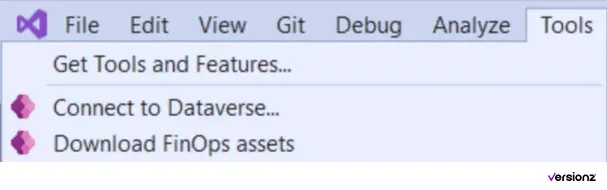
- Go to Tools > Connect to Dataverse. (Use Tools > Download FinOps assets instead when you want to force a fresh download, for example after an environment update.)
- In the login dialog, select Login and sign in with the developer account that has System Administrator in the UDE. If your Windows user is a different account, do not pick the signed-in user; enter the developer account instead.
- If your account uses multi-factor authentication, clear all the checkboxes on the login screen before you sign in.
- Select your UDE from the list of environments. If you have only one development environment, Visual Studio may connect to it directly without showing the list.
- Select a solution (for example, the default solution) and choose Done.
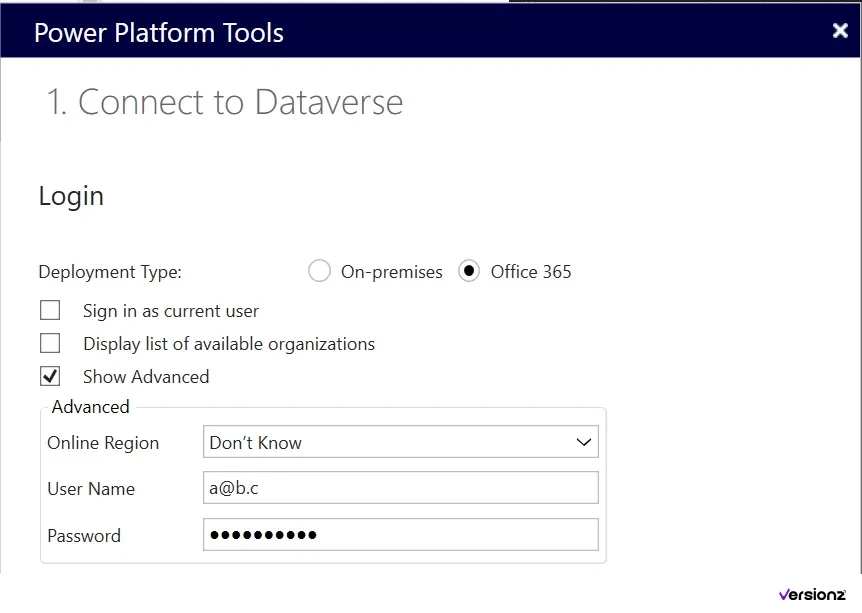
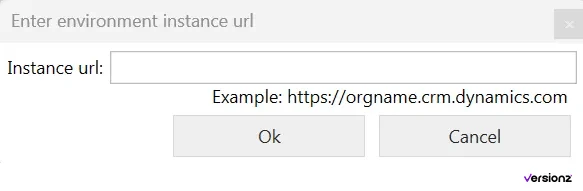
If you are a guest user in the client's tenant: go to Tools > Options > Power Platform Tools and tick Skip Discovery when connecting to Dataverse. Clear all the boxes on the login screen. When asked, paste the Environment URL of the UDE (the crm.dynamics.com one), not the Finance and Operations URL.
3.2 Download the F&O extension and metadata
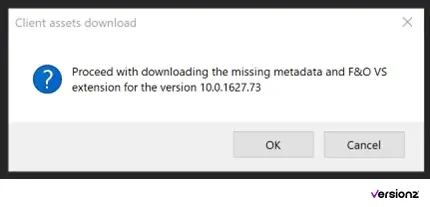
After you connect, Visual Studio asks if you want to download the F&O Visual Studio extension and metadata. Choose OK. Follow the progress in the Output window. The download is large, so give it time.
The files are saved here:
C:\Users\<User>\AppData\Local\Microsoft\Dynamics365\<ApplicationVersion>| File | What it is |
|---|---|
Microsoft.Dynamics.FinOps.ToolsVS2022.vsix | The F&O extension for Visual Studio |
PackagesLocalDirectory.zip | The system metadata (all Microsoft models) |
DYNAMICSXREFDB.bak | A backup of the cross-reference database |
TraceParser.msi | Trace Parser, for performance traces |
3.3 Install the F&O extension (only if asked)
With auto setup on, Visual Studio usually handles this for you. If the Output window says you need to install the extension:
- Close Visual Studio.
- Open the folder above in File Explorer.
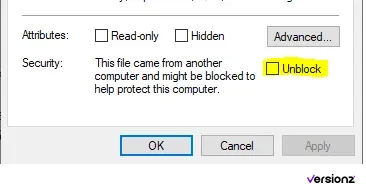
- If Windows has blocked the downloaded files, right-click each one, select Properties, tick Unblock and select OK.
- Double-click
Microsoft.Dynamics.FinOps.ToolsVS2022.vsixand finish the installer. - Start Visual Studio again. The first time after you install or update the extension, it asks for administrator permission. Accept it. The extension needs this to register its URL handler, set up build targets and extract the compiler files.
Step 4: Configure the metadata
The metadata configuration tells Visual Studio where Microsoft's code is, where your own code goes, and which database to use for cross-references.
If auto setup is on (default)
You have almost nothing to do. Visual Studio extracts PackagesLocalDirectory, restores the cross-reference database and creates the configuration for you.
- Watch the Output window until it finishes, and do any action it asks for.
- Restart Visual Studio.
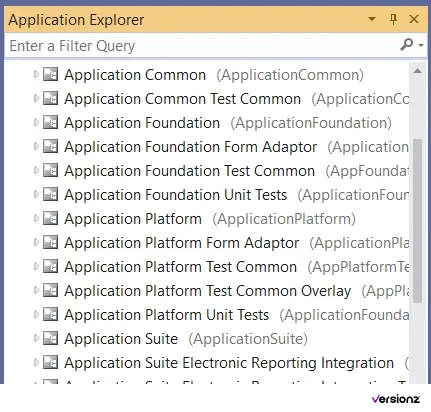
- Go to View > Application Explorer. If you can see the AOT tree with Microsoft's models, your setup is working.
If you want to configure it yourself
Turn off Auto setup for Dynamics 365 if using Unified environment before you download (Step 2.5), then:
- Extract
PackagesLocalDirectory.zipinto a folder namedPackagesLocalDirectory. A tool such as 7-Zip is much faster than Windows for this. - Open Visual Studio, select Continue without code, then go to Extensions > Dynamics 365 > Configure Metadata. If you do not see this menu item, open Extensions > Dynamics 365 > Infolog once and try again.
- Select New and fill in the fields:
| Field | What to enter |
|---|---|
| Name | A name for this configuration, for example ContosoUDE01 |
| Description | A short note, for example the environment and version |
| Cross reference database server | (localdb)\. for LocalDB, or localhost for a full SQL Server |
| Cross reference database name | Any name, for example DYNAMICSXREFDB. Visual Studio creates it if it does not exist. |
| Application version to restore cross reference database from | Select the version shown. It comes from the files you downloaded. |
| Folder for your own custom metadata | The folder for your own models, for example C:\D365\Custom. Point it to your source control folder if you use Git. |
| Folders for reference metadata | The path where you extracted PackagesLocalDirectory. Add the folders of any ISV models here too. |
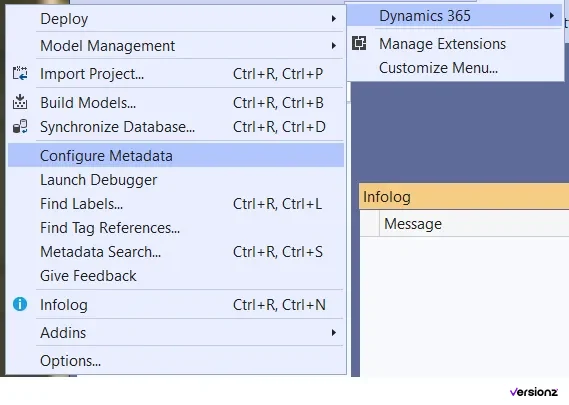
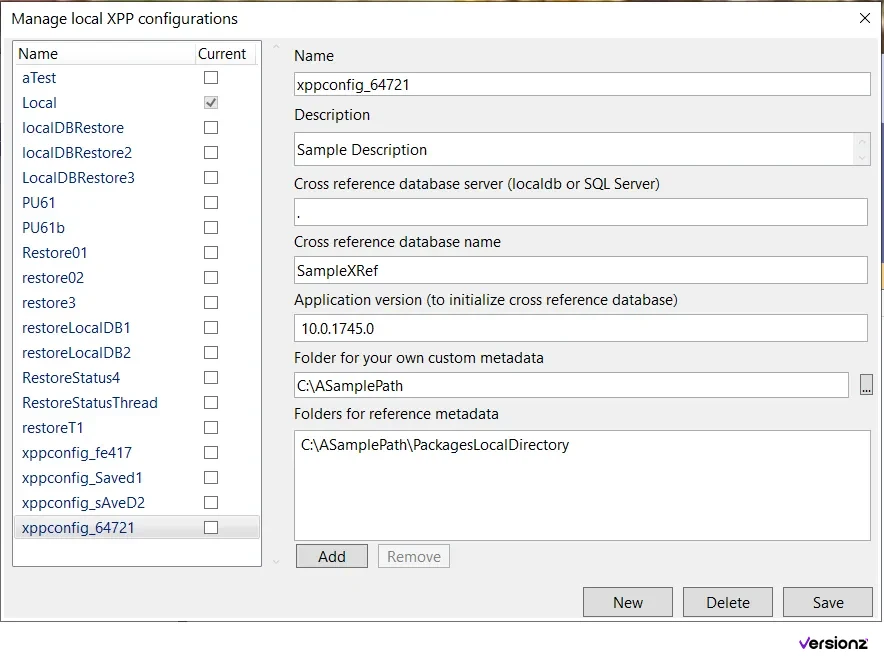
- Select Save. Only one configuration can be the current one, so make sure the new one is selected as current.
- Accept any administrator prompts, restart Visual Studio and open View > Application Explorer.
Tip: keep your own models in a separate folder from PackagesLocalDirectory. This keeps your source control clean, and you can download new system metadata after an update without touching your code.
Step 5: Create a model, then build, deploy and debug
X++ code runs only in the cloud UDE. So the flow is always: write and build on your PC, deploy to the UDE, then run and debug it from Visual Studio.
5.1 Create a model
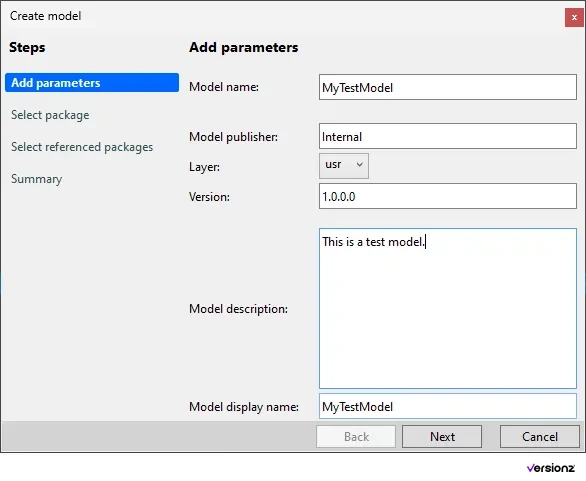
- Go to Extensions > Dynamics 365 > Model management > Create model. If this menu is missing, the F&O extension is not installed (go back to Step 3.3).
- Enter a model name, for example
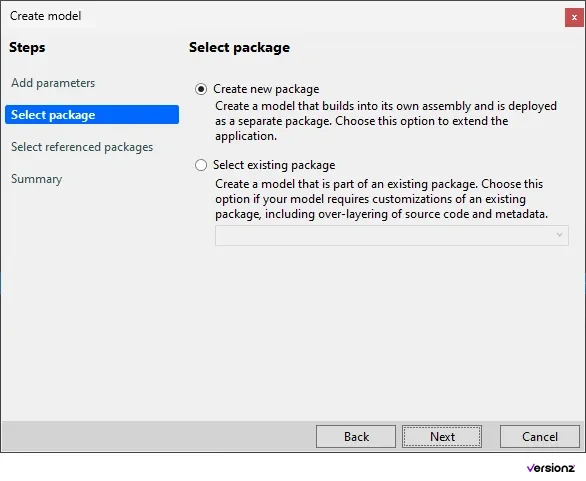
MyTestModel, and fill in the other required fields such as publisher and layer. - Choose Create new package.
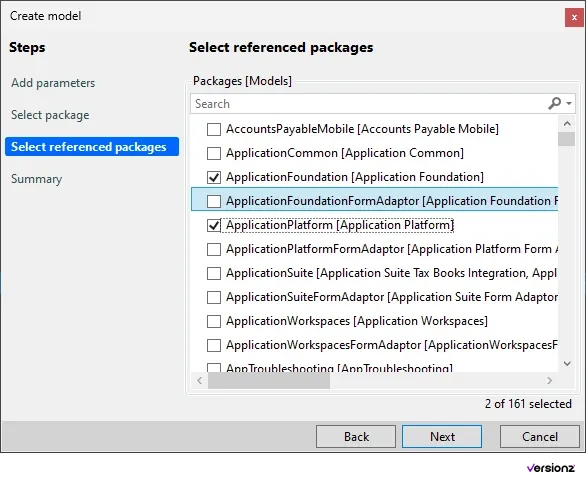
- Select the referenced models. For a simple test, Application Platform and Application Foundation are enough.
- Select Next until the model is created.
5.2 Create a project and a runnable class
- Create a new Finance and Operations project in Visual Studio. Check in the project properties that its model is
MyTestModel. - In Solution Explorer, right-click the project and select Add > New item.
- Under Dynamics 365 items > Code, choose Runnable Class and name it
MyRunnableClass. - Add this code:
internal final class MyRunnableClass
{
    public static void main(Args _args)
    {
        info('Hello World from the Server Side');
    }
}- Right-click the project and select Build.
5.3 Deploy the model to the UDE
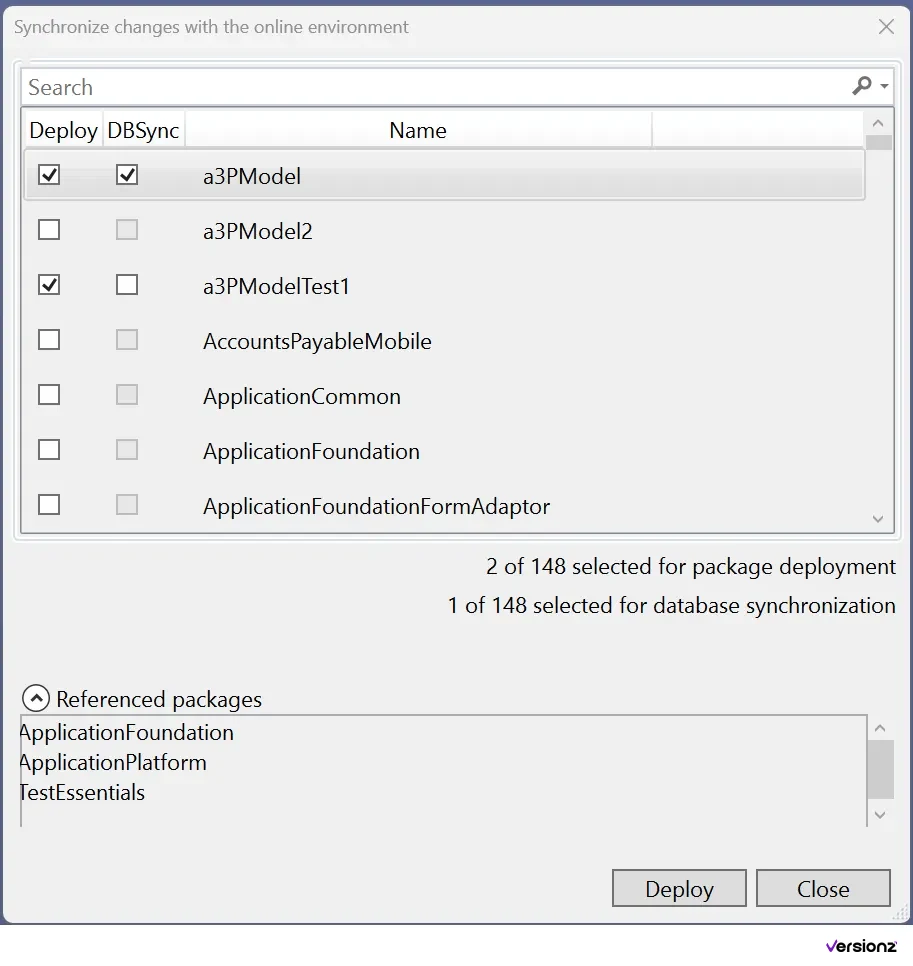
- Go to Extensions > Dynamics 365 > Deploy > Deploy Models to Online Environment.
- Search for and select
MyTestModel. The referenced Microsoft packages show at the bottom. You do not need to deploy them; they are already on the server. - Sign in with your Dataverse account if asked and wait for authentication to finish.
- Follow the progress in the Output window under FinOps Cloud Runtime. When it finishes, open the log link shown there to confirm it worked.
There are other ways to deploy once you are comfortable:
| Method | Where | What it deploys | Database sync |
|---|---|---|---|
| Deploy models | Dynamics 365 > Deploy > Deploy models | The full model | Optional, chosen in the dialog |
| Full build and deploy | Dynamics 365 > Build models, with Deploy to connected online environment on | The full model | Based on the synchronize database option |
| Incremental build | Build from Solution Explorer, with the project property Deploy changes to online environment set to True | Only changes since the last successful deployment | Follows the project's Synchronize database property |
| Project deploy | Right-click the project > Deploy model for project | Only changes since the last successful deployment | No |
| Sync only | Dynamics 365 > Synchronize database | Nothing new | Yes, for all models |
For daily work, the incremental build is the fastest: build, and only your changes go to the UDE.
5.4 Debug your code
- Go to Extensions > Dynamics 365 > Options > Debugging. Set symbol loading to include your solution items plus the ApplicationFoundation and ApplicationPlatform packages.
- In Solution Explorer, right-click
MyRunnableClassand select Set as Startup Object. - Put a breakpoint on the
info(...)line. - Press F5. A browser opens the class in your UDE, the debugger loads symbols and stops at your breakpoint.
- Press F5 again to continue. The message appears in the Infolog window in Visual Studio.
To debug a standard form, open it in the browser while debugging and change the mi= part of the URL to the menu item you need, for example mi=SysUserSetup. Then set breakpoints in that form's code from Application Explorer.
To attach to code that is already running, use Extensions > Dynamics 365 > Launch debugger.
Important: when you finish, use Debug > Detach All, not Stop Debugging. Stopping the debugger restarts the runtime in the UDE, which takes time.
Common problems and quick fixes
Most UDE problems have a simple cause. Find your symptom in the table.
| Problem | Fix |
|---|---|
| Provisioning fails with a missing license error | Assign the license that matches the template you used (for example, a Finance license for D365_FinOps_Finance). |
| The PowerShell command fails | Use Windows PowerShell 5.1, not PowerShell 7. |
| "Provisioning App isn't supported on SchemaType: Standard" | The environment was created without Enable Dynamics 365 apps. This cannot be changed, so create a new environment. |
| The Provisioning app install fails | Check that the Dataverse URL hostname is 19 characters or less, and that the environment is not linked to an LCS environment. |
| The Finance and Operations URL is not shown | Edit the environment and change the Description. This forces the URL to sync. |
| Visual Studio does not offer to download metadata | The environment must be a Sandbox with developer tools enabled. A Trial environment, or a sandbox without developer tools, does not work. You cannot convert it; create a new UDE. |
| Visual Studio cannot connect to Dataverse | Check that the environment is not in Administration mode, and that your account has the System Administrator role. |
| Configure Metadata is missing from the menu | Open Extensions > Dynamics 365 > Infolog once, then try again. |
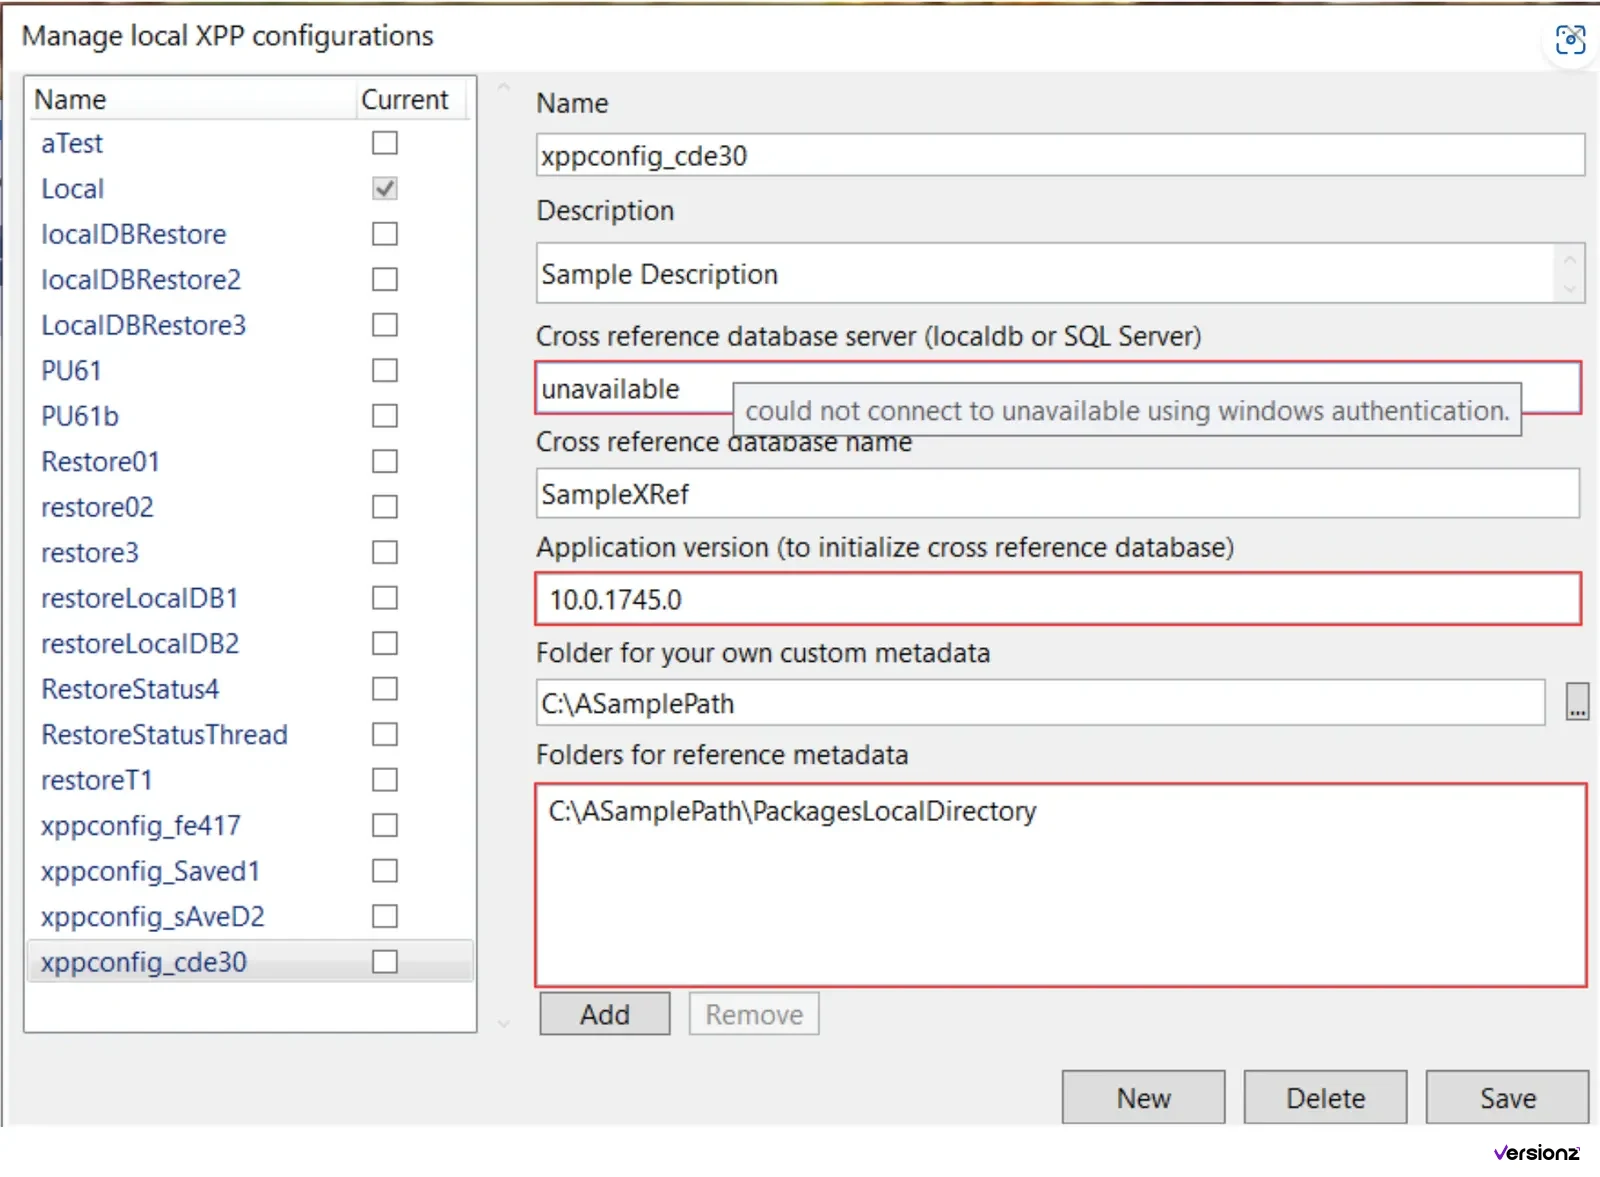
| The Save button stays grey in Configure Metadata | Look for fields with a red border. For LocalDB, the server must be exactly (localdb)\.. Run sqllocaldb create MSSQLLocalDB -s to start LocalDB. |
| Cross-reference database check keeps failing | Make sure your Windows user can access LocalDB. To reset it, run sqllocaldb stop MSSQLLocalDB, then sqllocaldb delete MSSQLLocalDB, then sqllocaldb create MSSQLLocalDB -s. If that fails, reinstall LocalDB 2019. |
| "Please wait for update to complete" keeps showing | Open PackagesLocalDirectory\bin\InstalledVersion.json in the download folder and set the version to your environment's platform version. |
| Application Explorer does not appear | Restart Visual Studio. |
Deployment fails with EnvironmentNotInReadyState | The UDE is not ready yet. Wait a few minutes and try again. |
| Deployment fails and you need details | Turn on Download logs in Tools > Options > Power Platform Tools, or open the Finance and Operations Package Manager app in the environment, go to Operation History and download operationlogs.zip. |
| The UDE restarts after every debug session | Use Detach All instead of Stop Debugging. |
| You need to re-download the tools after an update | Use Tools > Download FinOps assets. |
If you need to raise a ticket with Microsoft Support, share the correlation ID from the Output window, your machine name and the time of the error. Local logs are in C:\Users\<user>\AppData\Local\Microsoft\Dynamics365\Logs.
Quick checklist
Use this list to confirm your UDE is ready:
- License or admin role assigned, and at least 1 GB of free capacity
- Sandbox environment created with Dataverse and Enable Dynamics 365 apps = Yes
- Platform Tools installed, then the Provisioning App with Enable Developer Tools ticked (or the PowerShell script with
DevToolsEnabled=true) - Both the Environment URL and the Finance and Operations URL visible
- Developer account has the System Administrator role in the UDE
- Visual Studio installed with .NET desktop development and Modeling SDK
- LocalDB running
- Power Platform Tools extension installed and connected to the UDE
- F&O extension and metadata downloaded, and Application Explorer showing
- First model built, deployed and debugged
What's next
Once the basics work, connect your custom metadata folder to Git or Azure DevOps so every developer works from the same code. To use ISV solutions, put their models in one folder and add it to Folders for reference metadata. For build pipelines, use the Dynamics 365 Finance and Operations Tools extension for Azure DevOps, which creates and applies packages for UDE.
UDE takes a little setup the first time, but after that a new environment is one script or a few clicks away, and nobody has to manage a big VM again.
References
- Unified developer experience for finance and operations apps (Microsoft Learn)
- Tutorial: Provision a new environment with an ERP-based template (Microsoft Learn)
- Tutorial: Install the Finance and Operations Provisioning app (Microsoft Learn)
- Install and configure development tools (Microsoft Learn)
- Visual Studio requirements for X++ (Microsoft Learn)
- Write, deploy, and debug X++ code (Microsoft Learn)
- Unified developer experience FAQ (Microsoft Learn)
- Visual Studio 2026 and Platform Update 74: What D365 F&O Developers Need to Know (Logan Consulting)
Screenshots in this guide are from the Microsoft Learn documentation (MicrosoftDocs/power-platform) by Microsoft, used under the CC BY 4.0 license. The images have not been changed.